Creating a handmade Christmas tree is a fun and rewarding way to add a personal touch to your holiday decorations. This tutorial will show you how to make a charming Christmas tree using velvet wire (also known as chenille stems) and a few other basic materials. Follow this step-by-step guide to craft a festive tree that’s perfect for small spaces, tabletops, or even as a unique gift.
Introduction
A velvet wire Christmas tree is an ideal project for those looking to create custom holiday decor with a unique touch. Velvet wire offers a soft, textured look, making it perfect for this Christmas tree craft. This guide will cover everything you need to know, from gathering supplies to adding the final festive details. With easy steps and just a few materials, you’ll have a beautiful tree ready to bring holiday cheer into any room.
Materials Needed
- Velvet wire in your chosen color
Click to Buy - Foam cone or cardboard for the tree’s core
- Plastic tube for the tree stem
- Wooden or plastic base to support the tree
- Tinsel garland to create snowflakes or other decorations
Click to Buy - Additional decorations (optional)
Click to Buy - Flashing LED lights
Click to Buy - Hot glue gun
Click to Buy
Steps to Make a Velvet Wire Christmas Tree
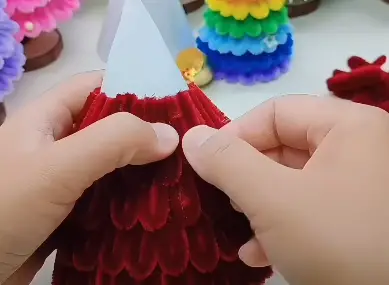
Step 1: Create the Tree Branches
- Cut velvet wire into segments approximately 7–10 cm long.
- Fold each piece of wire in half to create small branch shapes.
- Shape the foam cone or cardboard into a tree base, using it as a core for attaching branches.
- Use the hot glue gun to apply glue in a circular pattern around the core, attaching the velvet wire branches layer by layer. Start at the base and work your way up to the top.
- Once each row is in place, add the next row above it until you reach the tip of the tree.
- Bend and adjust the branches to give the tree a natural look.
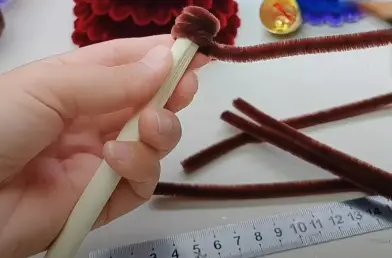
Step 2: Form the Tree Trunk
- Wrap velvet wire around the plastic tube or dowel you prepared for the trunk, securing the wire with glue to ensure it stays in place.
- Attach the trunk to the tree base with the hot glue gun, ensuring it is firmly in place.
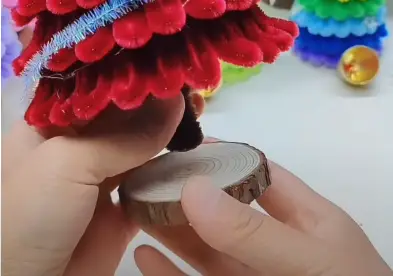
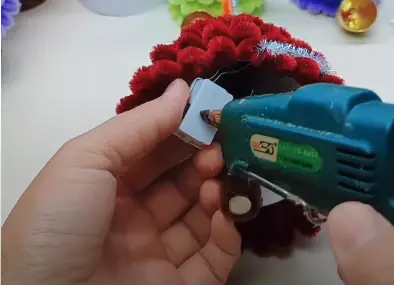
Step 3: Make and Attach the Tree Base
- Shape a circular base for the trunk, about 6 cm in diameter and 1 cm thick.
- Apply hot glue to the bottom of the tree trunk and attach it to the base.
- Hold the pieces together until the glue dries to ensure stability.
Step 4: Add Decorations
- Use tinsel garland or velvet wire to create decorative snowflakes or festive accents.
- Alternatively, pre-made ornaments can save time and add charm to your tree.

Step 5: Attach LED Lights
- Secure the LED light control inside the tree.
- Wrap the lights around the branches for a warm, twinkling effect.
With just a few steps, you’ve created a delightful handmade Christmas tree. This project allows for plenty of creative freedom—try different colors, add unique decorations, or even make multiple trees in various sizes for a stunning display.
Conclusion
Making a Christmas tree with velvet wire is a simple yet rewarding craft that brings holiday spirit to any space. With a few basic supplies, many of which are available at craft stores or online, you can customize your tree to suit your style. If you’re looking to stock up on supplies for this project, check out these links to recommended tools and materials to get everything you need for your DIY holiday creations. Enjoy making your own festive decorations, and let this handmade tree add a personal touch to your seasonal decor!


